 |
| Figure 1: Customize Start Menu. |
Having used Windows XP Professional operating system for several months, I have come across a number of problems and doubts, both mine and other people's, that took effort in researching the Usenet (newsgroups) and several knowledge bases in order to be solved. Others were solved by extensive experimentation. Here I accrue and share some of the experience with Windows XP, and wish they can make your use more enjoyable.
These tips and tweaks were tested in Windows XP Professional, so some of them might not work exactly as showed in XP Home version. Plus, most of them, if not all, must be done by an user with administrative power.
The Start Menu in Windows XP is quite customizable. It has a top level menu, the one it is first seen when you click the "start" icon, and the "all programs" lower level. The upper level menu is mainly subdivided into three parts: left side, above the separator line, or simply the pinned items list; left side, below the separator line, or the most frequently used programs list; and the right side, with several system-related icons.
The pinned items list contains a list of programs that remain there and are always available. Any program can be added to the pinned items list. Simply open the Start Menu, All Programs, right-click the program you wish to pin and select "pin to Start Menu" option. Once there, you can drag the icons to your preferred order. To remove a program, simply right-click on the pinned list and select "unpin from Start menu" or "remove from this list". See the next paragraph for an additional customization.
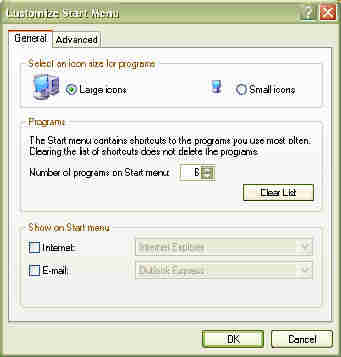
The most frequently used programs list is controlled by the operating system. Programs are added to this list the more often they are used. You can configure the number of programs shown in this list. Right-click on the "start" icon and select "properties", or right-click on the taskbar and select "properties", or, with the Start Menu open, right-click an open area (the border, for example), and select "properties". Click on the button "customize" next to the radio button "start menu". At the next screen, you can configure the number of programs on the most frequently used list and also clear the list. At the bottom, you can select two additional icons to be added to the pinned items list. One to represent the internet browser, and another to represent the email client. Just check the box next to each item and select on the drop-down menu the corresponding program, if more than one browser and email clients are installed. See Figure 1.
|
|
| Figure 1: Customize Start Menu. |
On the Advanced tab in this window, you can find more customization options. You can add more items to the right side of the top level menu and select appearance behavior.
When the All Programs list is quite small, my experience showed that new installed programs are added in alphabetical order. After a time, apparently without explanation, newly added programs start going to the end of the list. You can regain the alphabetical order by right-clicking anything on the all programs list and selecting "sort by name". You can also drag any item to the position of your preference.
If you came from Windows 98 or Me, the category-view Control Panel might be confusing at first, and some items might be hard to find. Switch to the classic view by clicking on the proper link on the left side of the Control Panel, and all items will be displayed.
Windows XP Pro provides a Control Panel entry to manage users (the User Accounts), and also inherits the Computer Management administrative tool from Windows 2000. Both do the same, but Computer Management Tool provides more options, such as password time and allows groups to be created. Control Panel User Accounts and Computer Management Tool are not properly synchronized, though, which may lead to problems. For example, the guest account can be disabled from both tools, but disabling the guest account in User Accounts might not show as disabled in Computer Management Tool and vice-versa. As a matter of fact, the guest account is turned off by default only in User Accounts.
In addition, and this might be very serious, it is possible to disable all administrator accounts in Computer Management Tool (this is not allowed in Control Panel User Accounts), thus rendering the computer inaccessible by any administrator. So, the Computer Management Tool must be used with caution. If its configuring options are not needed, it is best to rely on Control Panel alone to manage users.
By default, the Administrator account is not shown in the Welcome (logon) Screen. To access it, at the Welcome Screen, hit CONTROL + ALT + DEL twice. The classic logon screen will come up. Type administrator at the login name box and the password.
The Administrator account will be visible if Windows XP boots in safe mode.
You create a new user. This user logs on for the first time, opens Internet Explorer, begins to type an URL and voilá! There is already a history of typed URL's. The administrator then logs back on, clear all history and cache and creates a new user. This new user logs on for the first time, and the same URL history is still there! The administrator does a search in the registry, but finds nothing. Where is this list coming from?
This situation can happen if Windows XP was installed as an upgrade over Win 98 or Win Me. The Typed URL history is then passed on to the Default User settings in Windows XP. This history is save in the registry under the key
HKEY_CURRENT_USER\Software\Microsoft\Internet Explorer\TypedURLs
Each user, though, has their own set of registry settings, which are not shown when the administrator runs regedit. They must be loaded first. When a new user is created, he inherits all registry settings from Default User, and there resides the typed URL history which came from the operating system upgrade. Let's now erase this list, so every new user comes with an empty list. I present three ways to do this.
Remember that the registry is a vital part of the operating system. A wrong modification can render the system unusable. If you don't feel comfortable fiddling with the registry and using the regedit tool, don't. Use the other alternative methods next.
The Default User settings must be loaded. They are contained in the hidden file NTUSER.DAT in the hidden folder DEFAULT USER, under Document and Settings folder.
Every new user will now come with an empty URL history.
In this method, a dummy new user account is created. Logged on as this user, the cache and history are cleaned, and then the resulting settings are copied as new default. Although this method is effective in cleaning the URL history, it does not guarantee that the cleanest, smallest registry settings for the default user is created. Since the new user must log on, this action might create extra registry settings which will be passed on to the default user.
This method is basically the same method two, but the whole profile (all folders for the new user) is copied to the Default User, thus replacing everything under \Documents and Settings\Default User.
- or -
In Internet Explorer, if you type a word or phrase in the address bar, IE will open MSN Search and search for the word or phrase you entered. You can change this clicking Search on the tool bar and clicking Custom. There is a button named Autosearch Settings that allows you to select the preferred search engine for address bar searches.
Nevertheless, this method allows you to select a single search engine to do address bar searches. What if you want to access whichever search engine from the address bar, without reconfiguring Autosearch? For example, if you want to search for "food" using Yahoo, you can type "y food" in the address bar. If you want to search using Altavista, you can type "av food" directly in the address bar. I will show you two methods of accomplishing this.
PowerToys are a traditional set of tools and utilities for tweaking and configuring Windows, offered for free since Win95. Most important of these tools is TweakUI, that allows access to several settings that are hard to find or almost hidden using normal Windows tools. Plus, the PowerToys team usually pack some nifty utilities along, such as an Open Command Window Here option in the context menu for folders, a graphical calculator, a CD slide show generator, a virtual desktop manager (that allows up to 4 desktops to be kept), and a webcam timershot (to generate pictures from a webcam to the web). This method uses TweakUI for configuring address bar searches.
PowerToys is available at http://www.microsoft.com/windowsxp/home/downloads/powertoys.asp. (As of January 31, 2002, a post indicated PowerToys were being improved and would be available again in the spring. Meanwhile, you can get them here: http://xp.xyu.ca/winxp/XP-Powertoys.zip.)
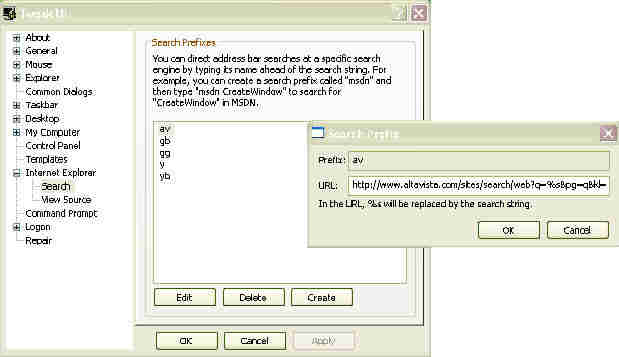
In TweakUI, navigate to Internet Explorer, Search. There, you can create and configure the Search Prefixes, as mentioned in the examples above. The creation involves the prefix itself and and a proper URL that will access the search engine and pass the string to be searched. I will go through an example of creating a prefix, and then I will provide a table with several prefixes that I created. See Figure 2 as reference.
 |
| Figure 2: TweakUI, configuring address bar search prefixes |
You can follow the same routine for any search engines you desire to configure. Here's a list of some prefixes and URL's that I use.
| Search Engine | Prefix | URL |
| Altavista | av | http://www.altavista.com/sites/search/web?q=%s&pg=q&kl=XX |
| Google Brasil | gb | http://www.google.com.br/search?q=%s&hl=pt&lr= |
| gg | http://www.google.com/search?hl=en&q=%s | |
| Yahoo | y | http://search.yahoo.com/bin/search?p=%s |
| Yahoo Brasil | yb | http://br.busca.yahoo.com/search/br?p=%s |
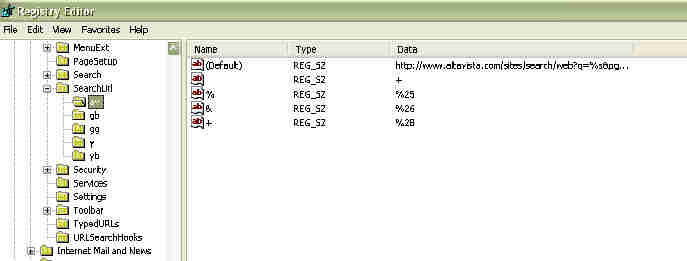
You can enter the search configurations directly into the registry. The key that contains the search prefixes is
HKEY_CURRENT_USER\Software\Microsoft\Internet Explorer\SearchUrl
Below I provide a registry entry for the Altavista search showed above. Copy the text between the lines to the Notepad, save with the extension .reg and double-click the file. You can then replicate the entries for each prefix, changing the key names for each prefix and the URL [which is a string value with the name (Default)]. There are four other string entries created, and they should be the same for all prefixes. See Figure 3 for a screenshot.
Paste the text between the lines to the Notepad.
Begin
-----------------------------------------------------------------------------------------
Windows Registry Editor Version 5.00
[HKEY_CURRENT_USER\Software\Microsoft\Internet Explorer\SearchUrl\av]
@="http://www.altavista.com/sites/search/web?q=%s&pg=q&kl=XX"
" "="+"
"+"="%2B"
"%"="%25"
"&"="%26"
-----------------------------------------------------------------------------------------
End
 |
| Figure 3: Registry entries for address bar searches |
APIC stands for Advanced Programmable Interrupt Controller. Basically, APIC is implemented in the motherboard and must be supported by the operating system, and it extends the number of IRQ's available. APIC is mandatory for multiprocessor systems and can also be used in uniprocessor systems. Windows XP supports APIC, so as modern motherboards. Learn more about APIC here.
http://www.microsoft.com/HWDEV/PLATFORM/proc/IO-APIC.asp
By extending the number of IRQ's, the operating system can better distribute the interrupt signals to the installed devices, thus avoiding IRQ sharing and conflicts. In order to use APIC, it must be enabled in the motherboard BIOS prior to Windows XP installation. Once installed, you cannot change from APIC to PIC (the conventional interrupt controller, that has a limit of 16 interrupt signals), otherwise Windows XP won't boot at all. It must be reinstalled, but this reinstallation must not be a clean installation. A "repair" installation will do fine and maintain your program and settings. At most, you will have to update Windows through Windowsupdate and reinstall some device drivers, such as Creative Labs SBLive!.
If you installed Windows XP in PIC mode and change the motherboard BIOS to APIC, Windows will boot, but will continue to operate into PIC mode. It must be reinstalled or "repaired" in order to load the APIC HAL (Hardware Abstraction Layer).
You can check whether your Windows XP is configured to APIC or PIC in two ways. One, run msinfo32 from the command line. Under Hardware Resources, IRQs, check the IRQ numbers for your devices. On a PIC system, the numbers will be restricted from 0 to 15. On an APIC system, there will be more IRQ numbers after 15.
Second, under System Properties (Windows Key + Break), Hardware, Device Manager, expand Computer. A PIC computer will be likely listed as "Advanced Configuration and Power Interface (ACPI) PC". An APIC one will be likely listed as "UC Uniprocessor Computer". To be sure, double-click the device there and the "driver" tab. Click Driver Details. As article Q309283 in Microsoft's Knowledge Base states, if the driver is Hal.dll, the computer is operating in PIC mode. If the driver is Halapic.dll, it is under APIC mode.
Now what is all that for?
When I first built my Athlon XP 1600+ and Abit KR7A, I selected APIC mode. The resulting system was very unstable. The symptoms were:
I tried a number of things, from underclocking the computer, to several AGP settings, to removing the sound card and disabling the internet connection. None of them solved the problem. Since the only difference between this new system and the old one, apart from the motherboard, chipset and CPU, where the fact I opted for APIC, I finally suspected that was the problem. A research through the Usenet (newsgroups) revealed many complaints related to APIC and multiprocessor systems under Linux, mainly unrecognized network cards and lockups. When APIC was disabled, those systems would operate normally.
Apparently, some devices do not behave correctly under APIC, and they end up getting lost after a time. In other words, the IRQ signals send to them are not recognized and the devices are lost (probably the cause for sudden loss of network connection), and may keep repeating their processes (probably the cause for the repeating sounds). In my case, since I removed the sound card and the problem continued, the guilty devices might be the network cards or the Geforce card.
To solve the problem, I reverted my Windows XP installation back to PIC and the system has been rock stable since. In order to pinpoint the guilty device, I would have to reinstall Windows in APIC mode and remove each device in turns (mainly the PCI cards that use IRQ's) until the system proved stable. If the system won't be stable, then the problem resides either in the operating system's implementation of APIC, or in the motherboard's chipset (VIA KT266A). A task I still plan to do in the future. :)
Here's my configuration related to this case:
If you are having similar symptoms in your system, put APIC in your troubleshoot list.
This is it. :) As more tweaks and tips come along, I will update this article. Happy customizing!